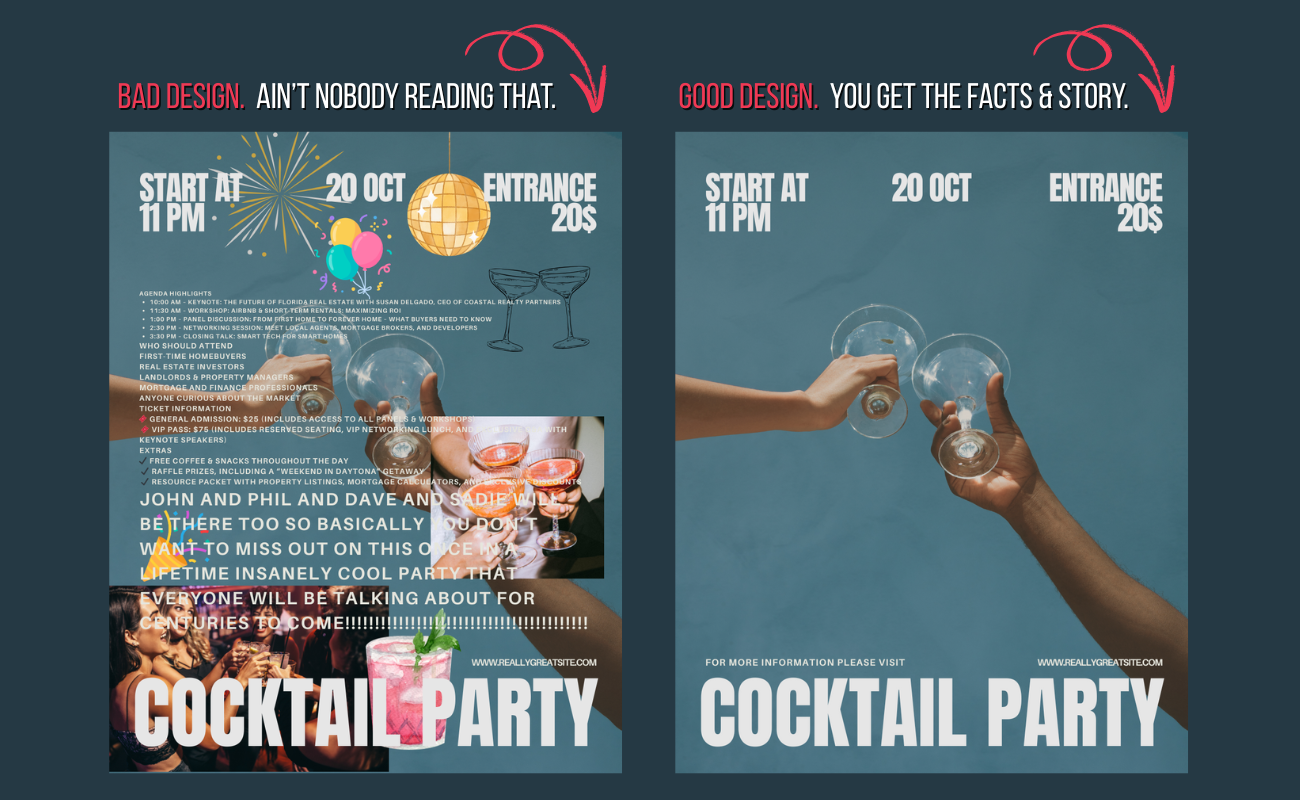
How do you determine what’s a bad event graphic design vs what’s a good event graphic design? We’ve been in this industry a long time and can help you understand the difference while teaching you tips from the pros!
When it comes to promoting your event, first impressions matter. A well-designed flyer can grab attention, spark curiosity, and motivate people to show up.

The good news? You don’t need to be a graphic designer to make one. With Canva’s user-friendly tools and templates, anyone can create a professional-looking flyer in just a few clicks and tips from a professional.
Here’s how to do it right.
1. Start with the Goal in Mind
Before you open Canva, decide what you want your flyer to achieve. Is it to drive ticket sales, raise awareness, or simply provide event details? Your goal will shape the design. For example:
-
Ticketed events need bold CTAs (like “Get Tickets Now”).
-
Community events may lean into fun, approachable imagery.
-
Business events might need a clean, professional look.
2. Choose the Right Template
Canva has thousands of pre-designed flyer templates. Use the search bar to type in keywords like music festival flyer, conference flyer, or holiday event flyer. Pick a template that feels close to your event’s vibe, then customize it. Now you might get lost in this stage because there’s so many options. Don’t overthink it and try to find the template that keeps it simple.
Pro Tip: You’ll probably need multiple sizes. For your Evvnt listing, you’ll want to use sizing of 500×500 works or for clearer copy try 800×800. For the featured image on Evvnt, 1000×400 works. For flyers sizing (8.5×11 in or A4) so they’re easy to print and share digitally.
3. Keep the Essentials Front and Center
When you first begin designing graphics your natural instinct will be to put everything and the kitchen sink on the images. *Slaps hand* No, teach yourself control. You want clear, focused images that tell your event’s story but don’t pull from the main message of what your event is about. Every event flyer should clearly answer these questions at a glance:
-
What’s happening? (Event name/headline)
-
When is it? (Date & time)
-
Where is it? (Location or online link)
-
How do I join? (Tickets, RSVP, or website/QR code)
Put these details in large, readable text. Avoid cramming too much info, less is more.
Pro Tip: Remember, you can put ALL of the details into your event listing and on your website. This is why your event title needs to also tell your event’s story.
4. Use Bold, Eye-Catching Visuals
Your flyer has seconds to catch someone’s eye. Use:
-
A high-quality photo or graphic that represents your event.
-
Colors that pop and match your branding (or seasonal theme).
-
Icons or illustrations from Canva’s free library to highlight details (like a ticket icon for pricing or a map pin for location). Don’t go overboard, one or two will get you far.
-
Spacing is really important in design. So, make sure the spacing from your graphics to your text are aligned and not just randomly dropped in. For example, if you put text in the upper right corner put your logo or graphic in the lower left corner, both at the same distance from the image’s edge.
5. Make It Readable (Even from a Distance)
Think of someone seeing your flyer on a café wall or scrolling past it on social media. Use:
-
Large, bold fonts for the headline. Try to keep the font size 14+ at the very minimum. Can’t nobody read your 6-point font details.
-
2–3 fonts max, preferably a thicker font with a thinner font. (Canva recommends pairings).
-
High contrast between text and background. Use the shadow effects to help the copy pop out more.
6. Add a Call to Action
Don’t just inform—invite! Add a strong CTA such as:
-
“Reserve Your Spot Today”
-
“Scan the QR Code to Get Tickets”
-
“Join Us for the Biggest Party of the Season”
- “For more information visit our website”
Canva lets you insert clickable links if you’re sharing digitally. For print, generate and drop in a QR code.
7. Export & Share Everywhere
When you’re done, download your flyer in PDF (Print) for physical copies and PNG/JPG for digital sharing. Canva also lets you publish directly to social media platforms, making your flyer a cross-channel tool.
Final Thoughts
Designing a flyer doesn’t need to be complicated. And the simplicity of your design is what really determines a good flyer design verses a bad flyer design. With Canva’s templates and tools, you can create something eye-catching, professional, and effective in less than an hour. The key is to focus on clarity, visuals, and a clear call to action.
Don’t be afraid to try graphic design. You’ve got this!
